Want to set up a Pesapal business merchant account, integrate it with your WordPress and WooCommerce online shop – to receive and accept payment online in Kenya through MPESA, Airtel Money, VISA card, MasterCard, or payment services provided by Equity, KCB or Co-Operative Bank?
That’s a great idea because Pesapal will make it easy for your clients and customers, in and outside Kenya, to shop from your store and pay for the products and services you sell them via Safaricom M-PESA, Airtel Money, Pesapal e-wallet, VISA card, MasterCard, Equity Bank Eazzy 247 Bill Payment, KCB’s KCBMobile, Cooperative’s Co-opMobile and Chase’s ChaseMobile.
In this post you will learn how to accept | receive money via M-PESA on your website or blog using Pesapal.
Note: This post may contain affiliate links. When you click on something I recommend and purchase it, I will receive a commission for the sale – at no extra cost to you.
What you’ll need to integrate Pesapal with WordPress + WooCommerce
Table of Contents
- A Pesapal merchant business account – registration is free
- Your self-hosted WordPress blog or website – hope you have this already. If no, it is time to start your site. Get a domain name and web hosting. If you already have a site, then no costs for you here
- Woocommerce e-commerce plugin – installed and setup – the plugin is free
- Pesapal Gateway for WooCommerce extension – free (linked to below)
- Familiarity with WordPress sites especially the admin area
- Working email address – one you have access to
- Your business logo – not a must
Let’s get started creating a Pesapal business merchant account
Click here to register Business Merchant account on Pesapal (link opens in a new tab)> click Business > click Register > then enter your details.
The details to enter in Pesapal are as follows
- Business name
- Select country
- Enter username
- Enter a valid email address
- Enter password twice
- Click the Get Started button
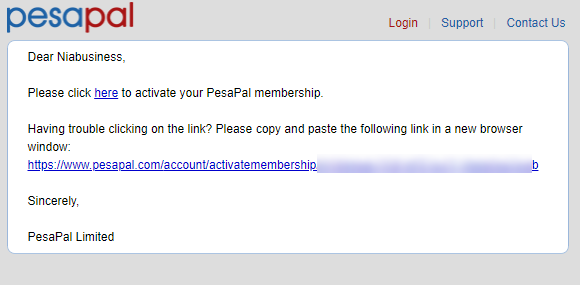
Now go to your email inbox. You should see a link from Pesapal. Click the link in it to activate your PesaPal account (membership).
On the Pesapal.com website, login with the email (username) and password you created and click the Login button.
0- Browse products by brand: Tecno, Infinix, Samsung, Huawei, Annov, HP, Garnier, Apple, Android, Ramtons, LG, Oppo, Redmi / Xiaomi, Nokia, X-tigi, iTel, Zuku, DStv, Startimes, GOtv, ZTE, Cubot, Gionee, Realme, Lenovo, Motorola, Oukitel, Oneplus, Bruhm, Phillips, Umidigi, Hisense, GLD, Skyworth, Amazon, Mika, Vivo, Oraimo, Toshiba, Acer, Asus, Syinix, Sayona, Von Hotpoint, Ampex, Sony, Toyota & Honda on Jumia Kenya.
NOTE: Don’t sign out of your email yet (and keep the tab opened). Pesapal will send you another email with details you are going to use in another step below.
Now you are in your Pesapal account dashboard. If you have your business or blog’s logo saved on your computer, you can upload it right now. It will appear on all the invoices and receipts you and your customers (clients) get.
NOTE: You can change the logo later if you want by clicking Edit Account > Edit Logo > Choosing the logo file location in your device > clicking Upload file.
Now that this is done, click Edit Account > Edit Profile.
Here you can change the following: Your email address, business name, contact name, contact
title, address, postal code, mobile number, fax, and city.
NOTE: You will see your username at the top of the profile page, but you can’t change (edit) it. You can also enable or disable the option to Receive Email notifications for transactions and SMS notifications. Click the Save button after making any changes.
1- Browse latest clothes, shoes, baby fashion, kid’s fashion, women’s fashion & men’s fashion, electronics, feature phones, smartphones, laptops, tablets, power banks, memory cards, smart watches, on Jumia.
Still in your PesaPal dashboard (My Account), click IPN Settings and then leave this tab in your web browser open – you need this to complete a step below.
Download Pesapal Gateway for WooCommerce from WordPress plugins repository
How? Get the plugin in zip format here and save it in a location where you can easily find it in your device (laptop, desktop, tablet, whatever you are using).
You can also learn more about the plugin by heading to the plugin page on WordPress.org via the same link.
Now assuming, you are using WooCommerce WordPress e-commerce plugin to power your online shop or plan on using it to sell services or digital and physical products or a combination of both (in this how to, you need to have installed WooCommerce and set it up), login to your WordPress dashboard.
Click Plugins then Add New > Upload Plugin (you can always append /wp-admin/plugin-install.php?tab=upload to your site’s domain in your browser’s address bar to get to this page – it’s quicker).
Ex: example.com/wp-admin/plugin-install.php?tab=upload
Click choose file > Locate the folder where you downloaded the plugin > Choose the plugin > Click install now > Click activate plugin.
Once this is done, head to your WooCommerce Settings page.
Select WooCommerce in your WordPress dashboard on the left column and click Settings or simply append /wp-admin/admin.php?page=wc-settings to the domain, directory or subdomain where you have WordPress installed.
Click the Checkout tab in that same page and then click on Pesapal.
To enable customers (clients) to pay for products and services you add to your WooCommerce shop page, check the box next to the words, ‘Enable Pesapal Payment’.
You can leave the Title and Description fields as they are or change them to Pay via M-PESA or Airtel Money using your phone and Pay by either credit/debit card or M-PESA respectively.
Check the box that says Use IPN.
Now, remember me telling you not to log out of your email account just yet? Go to your inbox. You’ll see another email sent to you by Pesapal Limited.
In it are two keys: Your Pesapal Consumer Key and your Pesapal Secret key.
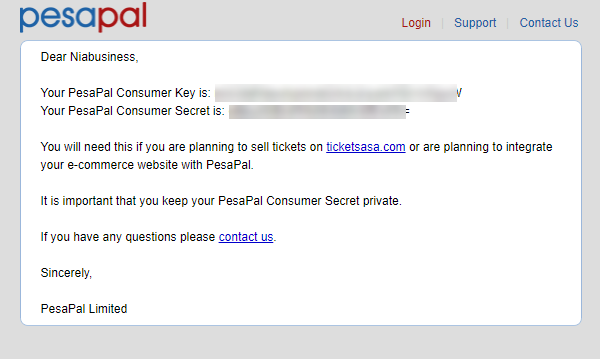
Don’t share these. They are for your eyes only.
What do you do with them? Copy the consumer key and paste it into the Pesapal settings window you have open in your WordPress admin. Paste it into the right field, the one that says consumer key.
Do the same for the secret key but paste it in the secret key field.
Make sure you copy them carefully because it is easy to paste an incomplete key.
Done this? Good.
Still in your WordPress (WP) admin, you’ll see the field above the Pesapal consumer key field populate. This is the field with, ‘This is the IPN URL that you must enter in the Pesapal control panel. (This is not editable)’ beneath it.
Copy this URL and head back to the Pesapal dashboard (you didn’t close the tab in your web browser?). Paste the URL into the second field, the one that says ‘Website IPN Listener URL’ and in the field above it, that says Website Domain, enter your WordPress website or blog’s URL e.g. example.com (change this to your site’s URL) then click the Save URL button.
You can always click on Edit URL Details link on this same page to enter the details correctly if a mistake is made in the first attempt.
We are almost done connecting Pesapal payment processor to your WordPress website or blog
Head back to the WordPress Pesapal settings page in your WP admin.
Check the box that says Enable logging and click Save changes.
Done.
You can now start accepting payments via the different methods allowed by Pesapal.
Go to your shop page and test how it is working. In fact you can check the box that says Use Demo Gateway in the Pesapal settings page in your WP admin area then do some tests and see if things work fine.
Remember you have to uncheck the Use Demo Gateway box and Save changes for the people who come to your online shop to be able pay you via Pesapal.
So, don’t leave the box checked.
2- Browse latest TVs, fridges, microwaves, dispensers, cookers, furniture, kitchenware, vacuum cleaners, washing machines, headphones, earphones / headsets, phone cases, chargers, MiFi routers, bluetooth speakers on Jumia.
And save changes once you are done testing if things are set correctly (and the plugin is playing well with WooCommerce).
A very important reminder by Pesapal to keep your account secure
- Do not share your password with anyone and do not choose to have it stored on a browser by default unless necessary
- Once done with your account, always ensure you log out so that no one gains access to your account without your knowledge
- To continue receiving / accepting payments via Pesapal (because you’ll notice it has a limit – Kenyan Shillings 1000 – which requires signing a contract for it to be adjusted), you’ll need to sign a contract with them and meet their requirements. In my case, the PDF with the details of the contract (which I received via email) requires one to fill in the details about their business or organisation (so the business has to be registered for example as a limited liability company or sole proprietorship etc.).
- To sign the Merchant agreement contract (here’s a PDF sample of the Pesapal contract I received) prior to the limit of your Pesapal account being raised, even if you live far from Nairobi, there are some documents you have to submit to their office. First email them (helpdesk@pesapal.com or salesteam@pesapal.com) to tell them about the nature of your business (sole proprietor, partnership, company or NGO). Why? So that they can send you the appropriate contract in PDF. You can print the PDF, scan it and send it together with the other documents they ask for. Some of the documents include: Copy of business registration, copy of KRA pin number and tax compliance certificate, copy of your national identity car, your driver’s license or passport and a copy of a voided or cancelled cheque in the name of the sole proprietor.
NOTE: You can also accept / receive payments via Lipa na M-PESA (through Safaricom-Kopo Kopo service) on your website, WordPress blog or offline. Learn more in this interview with Kopo Kopo.
What else would you like to know more about to enable payments through the Pesapal gateway on your WordPress + WooCommerce blog or website? Add it below in the comments section.
PS: Niabusiness.com would like to send you awesome content periodically, via email, and give you instant access to our current and soon to be published ebooks. Interested? Sign up via email below. Thank you for reading the note. And please share this article on WhatsApp, Facebook and Twitter using the sharing buttons below…
Must I have a paybill or they use their own paybill on my site, or how does it work at that point?
You don’t need to have your own paybill number if you are using Pesapal. If you want your own paybill number, check this post about Lipa na M-PESA.